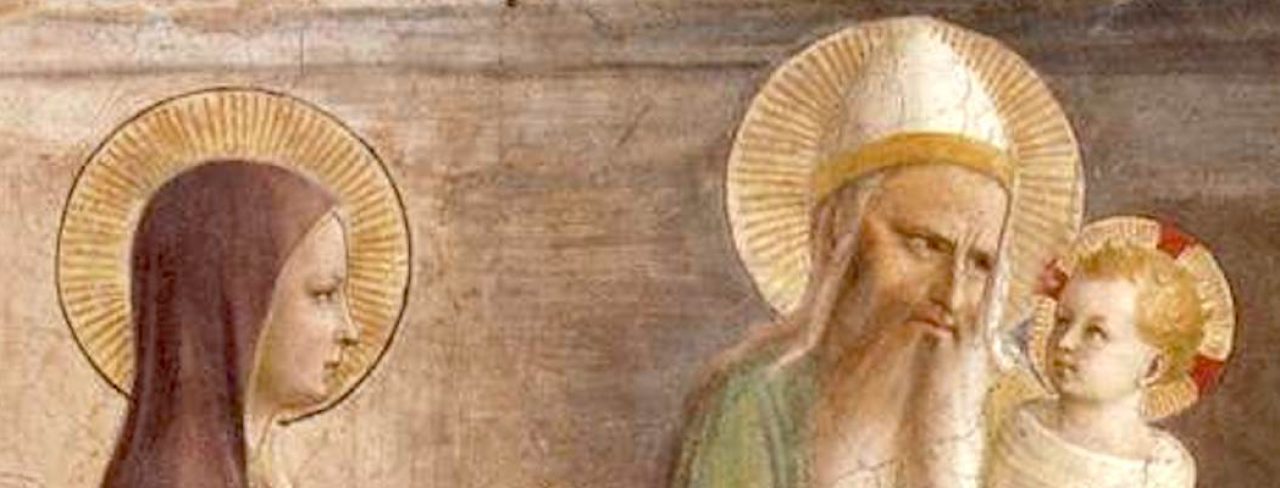
THE PURPOSE OF ST. JOSEPH’S ART WORKSHOP:
This Workshop is under the patronage of St. Joseph the carpenter, the master builder and protector of the Holy Family.
The purpose of this Menu Tab entitled St. Joseph’s Art Workshop is to discuss and present examples of step-by-step construction of sacred images in the Latin Rite tradition. I will post the Workshop lesson steps within this Menu Tab and not on this site’s regular Home page. I will notify viewers and surfers of the availability of a new post through the Home Page.
I desire to present an easy method for the painter to view construction steps and easily scroll up and down within this Tab to see previous or later steps without leaving this Tab itself. This will prevent the viewer from encountering the potential difficulties of searching within this blog’s Home page that are filled with other posts on a variety of issues. I hope to take you through an entire step-by-step creation of a sacred image.
This Workshop Tab will begin with the explanation of required materials and constructing a sacred image from beginning to end using acrylic paints. After finishing the first sacred image I will progress to building an image using egg tempera paints (egg yolk binder plus natural earth and mineral pigments). The future will bring the use of watercolor in creating sacred images of the Romanesque, Gothic, and modern period.
Please notice that I am not using the term “icon” within this Tab. My reasoning: the Greek Rite of the Catholic Church, and many other associated churches in the Orthodox and Eastern Rites, use the term “icon” to represent an image constructed according to certain principles and in a very specific and traditional way. I respect their right to claim the necessity of keeping true to their Canon of iconography within the Orthodox Tradition, and thus, only name a painting an icon if its elements conform to that Tradition. Other artists within this field of sacred art disagree with me about that point-of-view and it is their right to do so. Please read my post of April 2, 2018 on The Canon of a Catholic Sacred Artist (located in the Home page), it will help you put some of these issues in perspective.
Thus, this Tab’s pages will be presented as a free on-line “workshop.” I am happy to share with the interested artist or “budding artist” the information and experiences that I have had within this illuminating and prayerful field of sacred art. My explanations and sacred images will reflect my interpretation of painting within the Western tradition of sacred art. I do this as an ordained deacon of the Latin Rite, that is, the Roman Catholic Church. I do not claim to teach the methods or opinions of my teachers within this area of sacred art.
Some of my sacred images are in the style of an icon; however, at times I may not follow traditional rules, such as the exclusive use of certain materials, board preparation, etc. I will attempt to explain the differences as we progress through our experiences in the Workshop.
The first post associated with the Workshop is currently under construction with more to follow. Because of the nature of a workshop these posts, within this Tab, will be short and to the point. I will post a brief message on the Home Page to inform my subscribers and those surfing the web, that a new post is to be found in the Menu’s St. Joseph’s Art Workshop Tab. As mentioned before, The St. Joseph’s Art Workshop will be available as a continuous scroll so the viewer can refer back to previous posts and refresh their memories on the steps and materials discussed. Please continue to scroll down to read other posts in this Tab, I usually notify of an update around every seven to ten days to give the participating artist the opportunity to finish a particular lesson within this First Exercise of painting a sacred image.
This St. Joseph’s Art Workshop will not be a place for speculation or theorizing. It will be a site that will offer my insights on materials, methods, experiences, and suggestions. I desire it to be helpful to the viewer in building their own sacred image from “the ground up.” Hopefully, it will be a foundation for the participants artistic development and further study. The first post within this tab will be published during the weeks of April 2018.
March 26, 2018 © Deacon Paul O. Iacono 2011-2018
LESSON 1:
PAINTING A SACRED IMAGE – Getting Organized!
Required Materials, Part 1: Basic Art Stuff!
- In order to paint a sacred image a number of basic materials are required.
- Your paints will either be the paint line entitled “Jo Sonja” by Chroma, or, “Golden.” Jo Sonja is a good quality acrylic paint that is economical for the beginning artist. I would recommend paints by “Golden” if you would like to increase the quality of your paint and be able to pick them up at an A.C. Moore or a Michael’s store. I recommend the Golden paint in small squeeze bottles.
- The blue bottle is medicine dropper bottle that you will use to apply small amounts of distilled water to your paint cup. The bottle labeled “Flow Medium” is used to add small drops of this product to your paint in order for the paint to “flow,” that is, be applied in a smooth fashion. The little glass jar is used to wash out your brushes between colors. I use small glass jars, with distilled water in them, so I can wash out a brush filled with Titanium White and not get the brush contaminated with the water from an Ultramarine Blue. No worries if such things don’t bother you.
- The brush selection is critical. You will need the brush shape called “Round,” in sizes, “00,” and a # 2, 6, 8. The brand that I recommend is either Winsor and Newton, or (my favorite) Dynasty”s Faux Squirrel. Both of these brands, as well as the paints, may be obtained from dickblick.com. I also have a goat hair brush by Loew-Cornell, with the title “Maxine’s Mop” in a 1/2 inch size. This is a great brush to smooth out and blend paint with delicate vertical strokes. Check out Maxine Thomas’ YouTube videos on different techniques she uses with her brushes. I had difficulty finding these brushes in AC Moore or Michael’s. I eventually found them on Amazon.
- I highly suggest, that you obtain a “ruling pen,” a compass (good quality, as shown in photo) a “Tuff Stuff” eraser stick by Papermate, and a larger white eraser for pencil, and an inexpensive plastic 12 inch T-square (T-square cost: $5.00 at Staples). Your pencils should come from an inexpensive drawing set available at Dick Blick stores. I will provide you with a list of paint colors you will need, too. I have dealt with DicK Blick’s on-line store for many years. They are an American company based out of Illinois. I have spoken with them on the phone and on-line and they have always been reliable and courteous. It is fine if you like other on-line stores. A few that come to mind are Cheap Joe’s Art Stuff out of North Carolina, and of course, Amazon.
Required Materials, Part 2: THE BOARD – PANEL
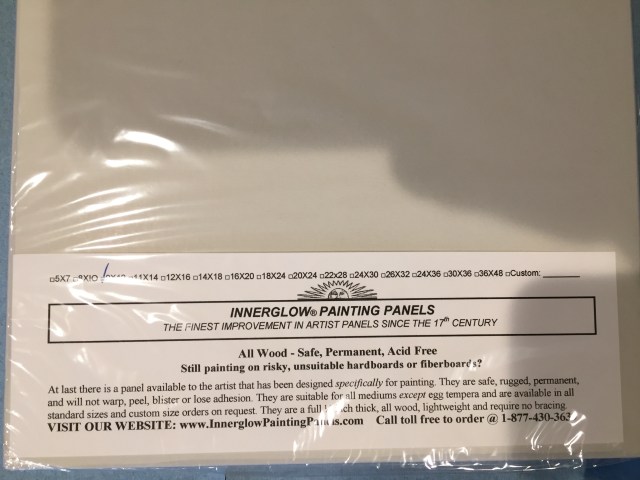
I highly recommend this company for your wooden panel on which you will paint your sacred image. The name of the company is Innerglow Painting Panels. They are based out of Pennsylvania. Their website is http://www.InnerglowPaintingPanels.com; phone number is 1-877-430-3639 (toll free). The size that I recommend for the sacred image that you will paint is a board that measures 9″ by 12″ and is 1/2″ thick.
Don’t worry if you call and get a machine. Just give them your telephone number and they will call back, or, deal directly with them on-line. They are courteous and efficient, too. Why do I recommend this panel? It is because, even though you may be a beginner, you will be proud of the sacred image you eventually will produce. Your first attempt deserves to be secure and preserved on a quality board. The cost is very reasonable; check the website for their current prices (I believe the current price for a 9″ by 12″ is $10. )
You should visit their website because they provide a thorough description of how they make their panels. These panels are for all media except egg tempera paints. Their products are all wood and safe. They have a very thin coat of what appears to be acrylic white on them when they are shipped to you. It is permanent and doesn’t affect the paint that you will put on top of it.
April 15, 2018 © Deacon Paul O. Iacono 2011-2018
Required Materials, Part 3: THE PIGMENTS
From Dick Blick’s Art Supplies Website (dickblick.com). I am providing you with a list of Jo Sonja paints by Chroma because, for the beginning artist, they are good quality paints while being inexpensive, too. If you would rather use Golden’s pigments, and/or mix and match, that’s fine, too. All acrylic paint is compatible across all companies. Make sure you purchase an acrylic medium to provide you with a medium other than water because you need the medium to act as an adhesive to flow the paint and act as a binder of the pigment to the board. Golden’s Cadmium Red Medium Hue in 2 oz. squeeze bottles is a necessary color for this first sacred image. Remember, A.C. Moore and Michael’s Craft shops provide you with an array of Golden colors, brushes, and mediums if that is easier for you, however, it will be slightly more expensive.
From the Dick Blick website: “Chroma’s Jo Sonja colors are flow formula acrylics. The colors are highly opaque, with excellent covering power and a beautiful velvet matte finish. Their colors are popular for decorating practically every surface from paper and canvas to wood, cardstock, terra cotta, metal, fabric, ceramics, glass, and some plastics. They conform to ASTM Quality Standard D-4302. All products in the range are compatible and clean up with mild soap and cool water.”
Mediums: 1) “Flow Medium — When mixed with Jo Sonja colors, the paint flows better for long strokes, liner work, calligraphy, and airbrushing. 2) All Purpose Sealer — This pure acrylic coating can be used as a surface “primer” to seal a wide variety of materials (including wood, metal, and glass) and to help the paint adhere better. There is no need to seal the piece first because the sealer is mixed directly with the color, so it goes on as you add a base coat or decorate. 3) Clear Glazing Medium — Transform Jo Sonja’s paints into transparent colors for glazing, for creating wood stains, or for special glaze painting techniques. The transparent color allows the underlying color or the wood grain to remain visible beneath the glaze layer.”
PIGMENT COLORS YOU SHOULD HAVE IN YOUR PAINT BOX FOR THE SACRED IMAGE YOU WILL PAINT IN THIS FIRST EXERCISE ARE IN BOLD FACE PRINT (total cost for the bold face pigments: $33.77 before shipping, handling, and tax) (THE OTHER COLORS WILL BE NECESSARY FOR OTHER SACRED IMAGES IN THE FUTURE). YOU CAN SAVE MONEY BY JUST PURCHASING THOSE YOU NEED FOR THIS TIME AROUND. THE COST FOR PIGMENTS, BRUSHES, BOARD, AND MEDIUMS SHOULD COME TO AROUND $100. 00 AMERICAN, plus taxes, shipping, and handling.
1) Jo Sonja’s Artist Acrylic – Yellow Oxide, 2.5 oz tube Item#: 00722-4114 $3.07
2) Jo Sonja’s Artist Acrylic – Warm White, 2.5 oz tube Item#: 00722-1784 $3.07
3) Jo Sonja’s Artist Acrylic – Vermilion, 2.5 oz tube Item#: 00722-3764 $3.07
4) Jo Sonja’s Artist Acrylic – Ultramarine Blue Deep, 2.5 oz Item#: 00722-5134 $3.07
5) Jo Sonja’s Artist Acrylic – Titanium White, 2.5 oz tube Item#: 00722-1704 $3.07
6) Jo Sonja’s Artist Acrylic – Storm Blue, 2.5 oz tube Item#: 00722-5914 $3.07
7) Jo Sonja’s Artist Acrylic – Sap Green, 2.5 oz tube Item#: 00722-7094 $3.07
8) Jo Sonja’s Artist Acrylic – Red Earth, 2.5 oz tube Item#: 00722-3734 $3.07
9) Jo Sonja’s Artist Acrylic – Raw Umber, 2.5 oz tube Item#: 00722-8074 $3.07
10) Jo Sonja’s Artist Acrylic – Raw Sienna, 2.5 oz tube Item#: 00722-8064 $3.07
11) Jo Sonja’s Artist Acrylic – Purple Madder, 2.5 oz tube Item#: 00722-6414 $4.94
12) Jo Sonja’s Artist Acrylic – Permanent Alizarine, 2.5 oz Item#: 00722-3394 $4.94
13) Jo Sonja’s Artist Acrylic – Pacific Blue, 2.5 oz tube Item#: 00722-5014 $3.07
14) Jo Sonja’s Artist Acrylic – Norwegian Orange, 2.5 o Item#: 00722-4504 $3.07
15) Jo Sonja’s Artist Acrylic – Naples Yellow Hue, 2.5 oz Item#: 00722-4244 $3.07
16) Jo Sonja’s Artist Acrylic – Naphthol Red Light, 2.5 oz Item#: 00722-3194 $3.07
17) Jo Sonja’s Artist Acrylic – Green Oxide, 2.5 oz Item#: 00722-7374 $3.07
18) Jo Sonja’s Artist Acrylic – Gold Oxide, 2.5 oz tube Item#: 00722-9004 $3.07
19) Jo Sonja’s Artist Acrylic – Carbon Black, 2.5 oz Item#: 00722-2124 $3.07
20) Jo Sonja’s Artist Acrylic – Cadmium Yellow Medium, 2.5 oz Item#: 00722-4094 $6.23
21) Jo Sonja’s Artist Acrylic – Cadmium Yellow Light, 2.5 oz tube Item#: 00722-4074 $6.23
22) Jo Sonja’s Artist Acrylic – Cadmium Orange, 2.5 oz tube Item#: 00722-4534 $6.23 This item is Backordered – Expected 05/16/2018
23) Jo Sonja’s Artist Acrylic – Burnt Umber, 2.5 oz Item#: 00722-8054 $3.07
24) Jo Sonja’s Artist Acrylic – Burnt Sienna, 2.5 oz tube Item#: 00722-8044 $3.07
25) Jo Sonja’s Artist Acrylic – Burgundy, 2.5 oz tube Item#: 00722-3144 $3.07 This pigment is currently stocked but only 10 Available, Order Soon…
26) Jo Sonja’s Artist Acrylic – Antique Green, 2.5 oz tube Item#: 00722-7924 $3.07
If you purchased all the pigments in this list, cost of pigments is: $93.00
*** Remember to buy your brushes, the board, a bottle of Jo Sonja Flow Medium: 8 oz. Item #: 00712-1055 Cost: $5.55; and The Sealant is highly recommended – Item #: 00712-1045, All Purpose Sealer, 8 oz., Cost: $6.17. You may want to buy their medium that makes their colors more transparent, since they are manufactured to be opaque: Item # 0712-1005 Clear Glazing Medium, 8 oz., Cost: $7.10.
Estimated Shipping and Taxes: TBD
They ship to United States and internationally –
INTERNATIONAL PHONE +1-309-343-6181 EXT. 5402 · FAX (800) 621-8293
Within the USA: DICK BLICK ART MATERIALS · P.O. BOX 1267 · GALESBURG, IL 61402-1267 · TOLL-FREE PHONE (800) 828-4548
DICK BLICK ART MATERIALS · P.O. BOX 1267 · GALESBURG, IL 61402-1267 · TOLL-FREE PHONE (800) 828-4548 INTERNATIONAL PHONE +1-309-343-6181 EXT. 5402 · FAX (800) 621-8293
April 17, 2018 © Deacon Paul O. Iacono 2011-2018
LESSON 2:
OBTAINING, DRAWING, APPLYING A SACRED IMAGE TO A BOARD
As I have stated in my post entitled The Canon of A Catholic Sacred Artist (posted April 2, 2018), “Sacred Art, in all its various forms (architecture, painting, sculpture, stained glass, illuminated manuscript, metalworking, music, etc.) are the visual and auditory means through which we are assisted in our desire, through our soul, intellect, and senses, to be in union with the all knowing, all powerful, and beautiful God of Sacred Scripture and Tradition. Sacred art, therefore, is a cultural artifact that turns our heart, mind, and soul towards God in praise, penance, petition, and thanksgiving.”
Thus, when we paint a sacred image we need to remember its role in the life of the person who is observing it. The sacred image, through its very definition, should assist the person in their prayer and devotional life.
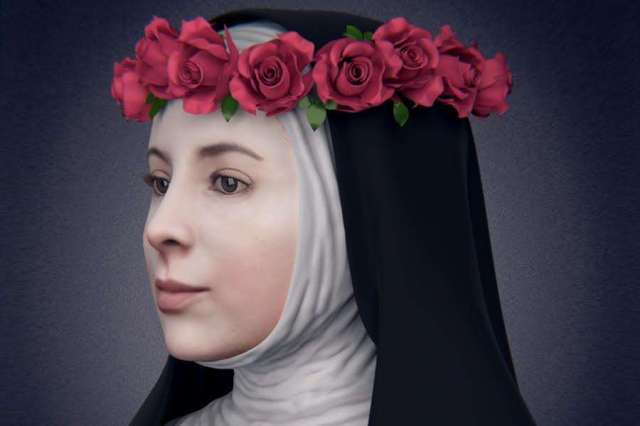
The sacred image that I have chosen for your first painting is that of Saint Rose of Lima, Peru. On August 28, 2015 the Catholic News Agency/EWTN carried a story with the title: Is This What Saint Rose of Lima Looked Like? Allow me to quote the article: “The face of the first saint of the New World may be better known than ever, thanks to a team of scientists that has analyzed the skull of Saint Rose of Lima. Scientists from the University of Saint Martin de Porres in Peru and the Brazilian Anthropological and Dental Legal Forensics Team reconstructed her face and the faces of two other saints who lived more than 300 years ago. The Dominicans have preserved the skulls of Saint, Rose, Saint Martin de Porres, and Saint John Macias in Saint Dominic Church, located in the historic center of the Peruvian capital of Lima. Under the care of Dominican friars and with strict security measures, the skulls were temporarily transferred to a clinic in Lima. There, the researchers took computerized tomography images. This is a process used in diagnostic medicine using CT or ultrasound scans. According to the news site Peru Catolico, the researches said the reconstruction shows she was “a pretty woman with soft features and well-distributed face.” Unlike her classical portrayals, the reconstruction indicates her eyes were large. St. Rose was born in Lima, Peru to Spanish parents in 1586. At a very early age she chose to consecrate her life to God. She practiced intense prayer and penance each day. She joined the Third Order of St. Dominic. After three years of illness, she died at the age of 31 in 1617.”
Below you will find the image of St. Rose of Lima that was constructed by the scientists, and the Brazilian Legal and Forensics team.
In order to paint this sacred image a number of steps must occur before we apply paint to our board.
STEP 1: Make a Sketch of the Desired Image.
This step can be accomplished in a number of ways. First, if you have developed your drawing skills you may make the sketch directly onto your board. If your drawing skills are not fully developed you may trace the chosen image directly onto the board; however, I recommend another way to do it.
If the image is found on the Internet, and you have the App known as PhotoSketch, you may have the computer App make a preliminary sketch for you of the image. After this is completed you may then, using Saral paper, or carbon paper (which can get messy) trace that PhotoSketch image onto your board.
Below is found the PhotoSketch image, that I enhanced, of St. Rose of Lima
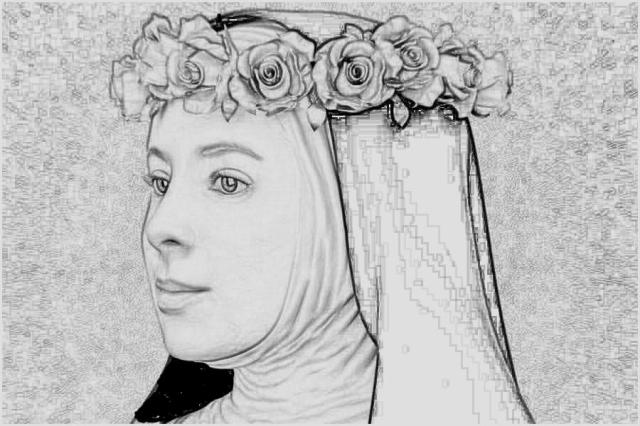
Depending upon your photocopier skills you can increase or decrease the size of this image to fit your board. Using the image above on a 9 inch by 12 inch board, you need to raise the horizontal borders 1/2 inch, and extend the two vertical borders on each side 1/2 inch in order to have a clean border around the image.
STEP 2: Preparation for Applying the Image to the Board
Making the sketch requires you to carefully trace or draw the image on the board. A student artist must continually practice drawing in order to obtain the fine motor skills that will produce an appropriate image. Before we put one drop of paint on the board we must make sure that our drawing is the best it can be. Many a student artist becomes frustrated with the painting process because their initial drawing was not properly executed. Even if you trace the image onto your board with Saral Paper (found in art stores and online at DickBlick.com) or carbon paper, you will still need to correct the tracing to make sure the drawing is the best you can do.
Below are photos of STEP 2 that I took. WARNING, I applied this image to the board when the board was on the VERTICAL. The image of St. Rose that I provided you in this post is meant to be applied on the HORIZONTAL, AS SEEN IN THE PHOTOS ABOVE. These photos are meant to be a guide for you in order to visualize this STEP.


The first picture above shows my sketch of the photograph on the Vertical. Remember, you are putting yours on the horizontal. I have applied the image to the board using 3M painter’s tape that you can find in hardware stores. Buy the blue tape that can be applied to cabinets – less adhesive – (3M makes three different types of blue tape). I lifted the image up off the board after applying blue tape along one side so that the image stayed on the board. I then slipped a piece of Saral or carbon paper underneath the image. and using blue tape, taped down the image over the Saral or carbon paper – using small amounts of tape on all four sides to keep the image steady. You are now ready to trace the image onto the board.
STEP 3: Applying the Image to the Board
Using an empty ball point pen, or a stylus or even a pencil, trace along the image with enough pressure to imprint your image onto the board.
- Go slowly, making sure the image does not move (you taped it on all four sides, right?!) start at the top and move down,
- Do not skip all over the page, doing the mouth and then her white inner habit, etc. If you do this you will lose track and miss sections. So. start at the top. Do the top of the habit first, moving down to complete the outer and inner habit. Then start the roses, and finish them. Then the eyebrows, eyes, etc.
- Go slowly and breathe!


The two pictures above show my setup before I started to trace the image. I used a stylus and a drink coaster with the cork side up to rest my hand on as I moved over the image to apply it to the board. The photo next to it shows the image on the board. This image had to be adjusted and entire areas hand drawn to make it appear like that actual image that the Forensic Team from Brazil created. You will probably notice the Papermate Eraser Stick. It is an artist’s best friend! Remember, no paint until the board’s image is the best it can be. Good fortune drawing and applying the image to the board!
April 26, 2018 © Deacon Paul O. Iacono 2011-2018
LESSON 3:
CORRECTING THE IMAGE AND APPLYING BASE COATS OF PAINT TO THE PANEL, FACE, BORDERS, LINES, AND ROSES.
It has been approximately one month since I last posted to St. Joseph’s Art Workshop. Hopefully, everyone (more than 40 people have expressed interest) has been able to apply the image of St. Rose of Lima to their board. First, read over the entire Lesson 3 once or twice before you begin to work. Thanks.
By the way, don’t feel concerned if you had to come back to your drawing and continually correct it. That’s fine; but always do it before you apply the first layer of paint. I am not going to remove any of the lessons, so, take your time to achieve the best drawing possible. Don’t feel ashamed to ask someone who knows how to draw to give you some pointers. The more experience you have with drawing the easier it will become. Drawing a basic and correct outline is key to any and all painting. As far as drawing is concerned, practice, practice, practice. Oh, by the way, did I say practice!
In this lesson you clean the board of any extraneous graphite from your pencil, and then apply base coats of paint to the lines and major areas of the board. I will provide you with specific directions for these steps.
The image that you see below is the final sacred image (done on the vertical plane of the board) that I painted of St. Rose of Lima. Please remember that the image below is not an icon in the traditional sense of a Byzantine icon, owing to the fact that a Byzantine icon is drawn and painted in a very specific way.
This sacred image is your basic model as to what you would like to achieve at the end point of all the Lessons in this Exercise of painting with acrylic paints. I will provide my step by step photos and directions so that you have a basic path to follow. 
Be positive!
Do I think that my painting is a perfect rendition of the anthropological reconstruction of St. Rose’s face by the forensic team in Brazil that I showed you at the very beginning of Lesson 2?
No, I don’t; and that is exactly the way it should be.
My image is somewhat, as the critics would say, a “naive” interpretation of the Brazilian team’s creation. That’s okay. It doesn’t hurt anybody, or insult the saint; I am satisfied with it. I think it is a good attempt at addressing the major components of St. Rose’s image. It could certainly be a part of anyone’s prayer corner.
We do not want photocopy perfect images of the religious figures that we paint. We have to be as accurate as possible in portraying the characteristics of the holy person so we can label the panel and make others aware of who it is. Yet, we want the image to contain elements of our personality and our style and ability at a specific moment in time. Our styles continually develop and evolve as we study and practice our art.
Let’s get started.
First, if you have a gray kneaded eraser, great. If you don’t, try to buy one in your area or on-line at DickBlick.com. The purpose of the kneaded eraser is to use the end of it and press it on the graphite or carbon line of your panel drawing. This will lift up excess carbon or graphite so that it will not mix with the paint. A gray kneaded eraser can be pulled apart (after you warm it in your hand) to continually cleanse its surface. The eraser will look dirty but it can be folded in upon itself to get clean edges. Believe me, it works.
DO NOT RUB THE ERASER OVER THE LINES. Carefully BLOT the lines.
You want to pick up the extra graphite or carbon on the lines, not remove them.
After you have cleansed the surface of the panel with the kneaded eraser it is time to apply some paint.
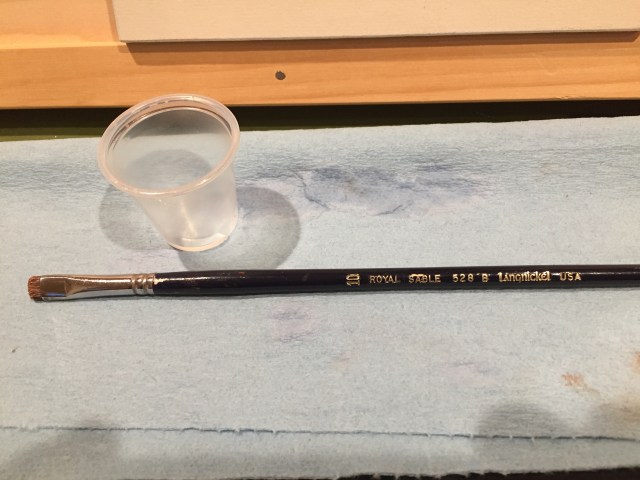
- Base Coat for the Entire Panel: If you purchased the Innerglow painting panel that I recommended in an earlier post to the Workshop, you will need to apply a base coat to the wooden panel. You need to mix three pea size amounts (yes, the size of a good size pea) of Titanium White pigment into a small plastic party cup that you see below (you can get these at any party store; they cost approximately $10.00 American for 100 cups and another $5.00 for the lids).
These cups work well for mixing paints. After you finish you can throw them away, no mess, no big clean-up. Also, if you have to leave your painting and will come back in a few days, just put your lid on and your paint will still be relatively fresh.When you come back to paint, add a drop of water, mix, and you are ready to go. Make sure you wash out your brushes in clean water during the painting process and after you have finished for the day. NEVER leave a brush standing up in you tub of wash water. This is the easiest way to ruin your bristles and rot the wooden handle.
After putting the paint in the cup, mix in three drops of Flow Medium, and two drops of water (I use distilled water to add to paint because I have a lot of minerals in my tap water, cost is about $1.50 American for a gallon). Using a small poor quality brush mix well for about ten seconds. Rinse out your brush in a small plastic container (butter tubs are great because they have lids, too).
Apply seven coats of this Titanium White mixture to the entire surface of the board using your #8 or #10 round brush, or a good quality 1 inch flat brush. Acrylic dries quickly on the brush and board. So be aware of the drying time so you can quickly put down another layer.
Use a relatively, what is called, “dry brush.” This “dry brush” is a brush that has paint on it but you have wiped it against a paper towel to take off excess pigment so you don’t have too much paint going on the board too quickly. You don’t want a sloppy paint look, rather, you want a smooth thin surface of paint going on to the board. You need to have seven layers of this smooth thin Titanium White to act as a base coat layer for the entire board. DO NOT PUT ON TOO MUCH PAINT AT ONE TIME. You want the paint to dry evenly. Make sure it is dry before you put on another layer.
Once you have put the seven layers on the board (this should take about a half hour of time) you need to look at your drawing and see the quality of your lines under the seven layers of paint. If they look good, you can proceed. If your lines don’t look good or you can’t see them clearly, lightly go over the affected areas with a thin pencil line to bring it up again.
Base Coat for the Entire Border: When everything is dry you can apply a border like I did (see above finished image). You don’t have to have a border, nor do you have to use green. You can personalize it and make it any color that you like as long as it enhances the image of St. Rose in her habit. We must always be respectful of the holy person whose image we are painting.
Using painter’s tape (the blue or green tape with a minimum amount of adhesive on it that is found in hardware stores) you can put down a border that will be even all the way around your image.
Since we are working on the horizontal face of the board, rather than the vertical side as in my image that you see above, you will probably have to extend the vertical borders 1/2 inch out on each side, and extend the horizontal borders up 1/2 inch on each side.
You are doing this because your image was probably drawn on a 8 and 1/2″ by 10″ piece of copy paper on the horizontal. You should mark it off with a ruler and thin pencil line before you lay down the tape on the inside of the line so you can paint the border on the outside edge all the way around the board in a nice clean manner. If you want a dark green color mix 90% green oxide with carbon black, slowly mixing in small amounts of carbon black until you arrive at the color you desire. Go ahead and paint two layers of this color around your border.
Base Coat for the Entire Face: mix 2 parts (2 peas) Warm White with one part (one pea) of Yellow Ochre, add your Flow Medium and in this case, 7 drops of water. Mix well. THIN LAYERS OF PAINT! Apply one thin layer over the face, let dry. Apply two more thin layers over the face of this paint mixture (not on the inside of the eyes). Again, it is a dry brush technique. NO SLOPPY PAINT LAYERS.
Base Coat for the Lines of the Face: When the face is completely dry, go ahead and take your # 00 or # 2 round brush and paint over the lines of the face with Burnt Umber (if you bought it) or one thin layer of a mixture of 95% Yellow Ochre and 5% Red Earth, to get a nice warm color. You will have to experiment with the mixtures to arrive at a color that you think is appropriate before you apply it to the lines of the face. This is part of the fun of painting!
Base Coat for Lines of the Roses and Lips: I didn’t do this in my original as you can see from the photo below. I wish I had done it because it makes everything easier. Use your # 00 or # 2 round brush and paint over your lines for the roses using a thin coat of paint (don’t forget to add 3 drops of Flow Medium and 2 drops of water (medicine bottle dropper helps) using pure Cadmium Red mixed with a small amount of white. You want to arrive at a delicate pink color. DO NOT paint the inside of the rose petals because you will want to do it in a specific way in order to achieve the effect of light emanating from them. Apply the same technique for the Saint Rose’s lips. Light coats of paint if you want to put one coat on the inside of her lips.
Base Coat for the Lines of the Outer and Inner Religious Habit: Paint over the lines of both the inside and outside of St. Rose’s religious habit, using a mixture of pure black for the outside habit, and 95% Titanium White and 5% carbon black for the inner habit – you want to achieve a light gray color for the inner part of her habit (along the neck) – don’t forget the Flow Mixture and the 2 drops of water. You can make the shadow lines of the inside habit with this same light gray color, slightly broadening out the line to give the impression of the shadows in the folds (see the Brazilian original photo or my final image above).
I took the photo below right before I was about to put on some of the colors. You can see that I was experimenting with base coat colors for face and lips. I recommend that you experiment with color choices on a piece of paper rather than your board!

May 22,, 2018 © Deacon Paul O. Iacono 2011-2018


You must be logged in to post a comment.